MindmapMaker
#1 mindmap app
Make a mindmap online (FREE forever)
Userguide
[tcb-script async=”” src=”//pagead2.googlesyndication.com/pagead/js/adsbygoogle.js”][/tcb-script][tcb-script](adsbygoogle = window.adsbygoogle || []).push({google_ad_client: “ca-pub-4110739479768364”,enable_page_level_ads: true});[/tcb-script]
Welcome to free Mind Map Maker
Welcome to Mind Map Maker, a free, fully HTML5-compliant with cloud support mind mapping webapp. This is a HTML5 based mind mapping application. It lets you create neat looking mind maps in the browser. It is available offline? You can use the app wherever you are, there is no need for an internet connection, everything happens inside your browser on your machine. This one is free, open source and it’s full of HTML5 goodness. You spend most of your time inside your browser anyway. Why not create your mind maps here as well?
Mind Map Maker
This is version 3.0 from Mind Map Maker. The first version is made by D. Richard. His version you can find HERE https://www.mindmaps.app/
The second version 2.0 is build by Abdul Azeem. He made the app more advanced. His version you can find HERE : https://app.mindmapmaker.org/#m:new
Versie 3.0 of Mind Map Maker has been further developed in order of Brainpartner by Madho Singh van Harsh Technology
We are pleased to let you know that Mind Map Maker Version 3.0 has been released now. Mindmapping is now easier and layout is more simple. Store your mindmaps in Mind Map Makers free storage server. This way you get a permanent url for your mindmap which can be shared across the world for mindmap sharing. Share your mindmap via social media sites. Maps stored in server are read only and each time you save a new copy, a new file with a new url is created. Google Drive is supported natively and you can now attach rich text, images, videos to your mindmap branches. You can also use Image branches and Connect non-related branches.
You can now attach URLs to a mindmap and hand drawn images to individual branches of a mindmap. There is a special drawing tool integrated to draw hand drawn images on the fly to your mindmaps. You can also set line width of individual connecting branches of your mindmaps manually.
[tcb-script async=”” src=”//pagead2.googlesyndication.com/pagead/js/adsbygoogle.js”][/tcb-script][tcb-script](adsbygoogle = window.adsbygoogle || []).push({google_ad_client: “ca-pub-4110739479768364”,enable_page_level_ads: true});[/tcb-script]
Start an online mindmap
Make sure there is an internet connection.Start the internet browser.

For example, choose Chrome, Firefox, Safari, Opera, Internet Explorer or Edge.
Start Mind Map Maker
Start Mind Map MakerEnter the following in the address bar: mindmapmaker.nland press EnterTip: From now on, no internet connection is required (until the mindmap is saved or shared)From now, you can start mindmapping.
Central idea (subject)
The mind map starts with the subject.Tip: Later we see how an image can be placed in the subject.The subject is shown in the middle of the screen and the mindmap is ready for further building.First put the word in the image that belongs to the subject.Double-click the word <Central idea>. And type the subject of the mind map.Press the Enter key.

Create main branches
When you move the mouse to the center of the subject, a red dot appears in the center.

Click on that RED point and hold down the left mouse button while dragging from that red point to, for example, in the upper right corner. You see that a smooth main branch appears.

Word on branch
If you have created a branch, the word is still selected. You can see that by the blue color around the word. If the word is no longer selected, double-click it. If your text is blue, you can type text directly.After typing in the text, press the Enter key and the text appears at the end of the branch.You can change text by double clicking on the text. Then type the desired new text.
Important
Select a branch by clicking once on the word on that branch.You will then see a light frame around the word.
Create sub branches
In the same way as a main branch, a sub-branch can be made.

- Move the mouse to the end of a branch. A red dot appears. The mouse automatically turns into a hand when the red dot is designated.
- Go to the red dot and press the left mouse button.
- Hold down the mouse button and drag a new branch out.
Move branches
The moment you hold down the mouse on a word and then press the left mouse button, you can change the position and the length of the branch.
Add borders
The words can be put in a frame. Click on the relevant word for this.Then choose <Layout> <Show border>.

Tip: The button with the three arrows means:also for all branches after that.
Using Image
With the latest version of Mind Map Maker, you can now use image. You can also print and ‘export as image’ with image branches.
To add an image to a branch, select that particular branch and click on <Add> <Image>.

It brings ‘Add/Change branch Image’ dialog.

To select an image, either click on the dashed rectangle area and select a file or drag and drop an image on to the dashed rectangle area.Once an image is selected, it is loaded on the dashed rectangle.

Select the appropriate alignment for your image and desired size. Then click ‘Save’. Your branch now should be having new image now.To remove the image from the branch, select that particular branch and click on <Add> <Image> again. It brings ‘Add/Change branch Image’ dialog again with a new button, ‘Remove’ this time.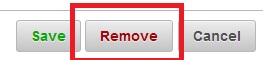
Click on ‘Remove’ button to remove the image from the branch.
[tcb-script async=”” src=”//pagead2.googlesyndication.com/pagead/js/adsbygoogle.js”][/tcb-script][tcb-script](adsbygoogle = window.adsbygoogle || []).push({google_ad_client: “ca-pub-4110739479768364”,enable_page_level_ads: true});[/tcb-script]
Connect branches
With the latest version of Mind Map Maker, you can now connect non-related branches, ie, non parent-child branches.To connect two branches, first select the branch where you want to connect from. Then, click on <Add> < Relation>.

Then click on the second branch where you want the connection to end. You cannot connect child-parent or parent-child branches. Otherwise, you can connect all other branches.Once you connect two branches, you can see a dashed line connecting those two branches.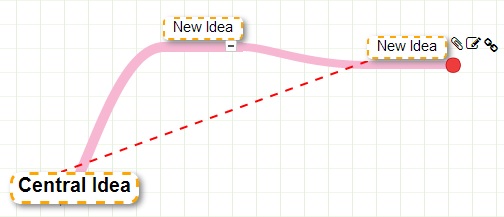
Once you created a connection, you can see additional properties of connection.Change properties of a connectionAfter creating a connection, this connection is now selected. To change its properties, pop-up window.

You can change its color (by default, it is orange), style (dashed, dotted or solid) and arrow options. You have the option to display arrow at both ends or at the ending end. Select, ‘double’ or ‘single’ from the drop down box accordingly.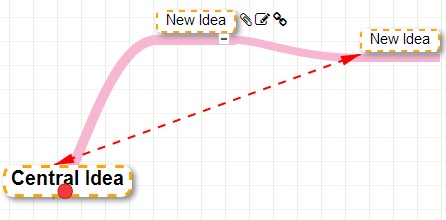
Selecting a connectionTo select another connection and change its properties, select either of the connected branches. Then click on ‘Relation’ again and then click on the other branche which is a part of the connection. Now, this connection is selected and you can see its corresponding properties in the pop-up window.Remove a connectionTo remove a connection, select the connection as mentioned above. Now, click on ‘Remove’ button in the pop-up window.
See, the connection is removed now.
[tcb-script async=”” src=”//pagead2.googlesyndication.com/pagead/js/adsbygoogle.js”][/tcb-script][tcb-script](adsbygoogle = window.adsbygoogle || []).push({google_ad_client: “ca-pub-4110739479768364”,enable_page_level_ads: true});[/tcb-script]
Attach comments to a branch
The editor used in Mind Map Maker to add comments is one of the best online editors out there. Actually, you might want to use it as an online tool for additional notes on a branch. It has been decided to use more functions than you might need. As such, this word processor is quite large. On the other hand, you probably miss nothing. Of course, it is always possible to add only a few words or a short sentence.
Basic characteristicsThe top row of buttons almost all speak for themselves, except <Broncode>. (means Sourse code.) You will not need these, but in principle it is possible to place HTML codes. For example, moving animations can be included in the comment. Youtube videos can also be embedded via the Source Code.


The middle and bottom rows contain standard buttons that you will always find on a simple word processor. Most buttons also speak for themselves. If necessary, hold the mouse over a button for additional explanation of that button.Note: there is no button save. Mind Map Maker automatically saves your work when you close the editor.Do NOT press the Maximize screen button. This leads to unexpected errors.Deleting a comment is possible by deleting all contents.
HyperlinksIt is possible to make hyperlinks within this comment; web links to other web pages. Note that these will then be included in the comment and not directly attached to the relevant branch.All above buttons can be useful and have some nice features. With the last button (Omega character) you can insert many special characters in the document.
Embedding videosVia the <Source code> button you can embed videos or other rich content from other websites. You can embed youtube videos in your document. It supports content from sites such as YouTube, Flickr, Qik, Vimeo, Hulu, Viddler, MyOpera, etc.Paste the content url and change it as desired. For example, to embed a youtube video, paste the youtube URL into the format:<iframe width = “640” height = “360” src = “https://www.youtube.com/embed/eO6jqTQzMAI” frameborder = “0” allow = “autoplay; encrypted-media” allowfullscreen> </ iframe>
Add imagesMake sure that when adding images, you place the image in the comment and not on the relevant branch itself.

Enter the URL of the image you want to use. You can also add a caption to this image by selecting the <alternative text> option. You can also enter an alternative text. This is used when a browser can not display the image. A useful feature of this tool is that you can change the size of the image or change its position during the process.A common way to get the URL of an image from a website is to right-click on the image and click on <Copy Link>.
Warning: the online image you use may be copyrighted by the owner. Use it wisely.
Note: If you use a URL to insert an image into your comment, it will not be saved as part of the mind map document. The image is still external and as long as the URL is valid, the image is displayed.Tip: Use images with a small file size. This reduces the entire mind map file, especially if you have a large mind map with many images. For example, .bmp files are relatively larger than .jpg or .png files. You can use image resizers (for example, THIS ONE) to reduce the size.
[tcb-script async=”” src=”//pagead2.googlesyndication.com/pagead/js/adsbygoogle.js”][/tcb-script][tcb-script](adsbygoogle = window.adsbygoogle || []).push({google_ad_client: “ca-pub-4110739479768364”,enable_page_level_ads: true});[/tcb-script]
Attach hand drawn image to a branch
You can attach hand drawn images to individual branches. To attach an image to a branch, click on that particular branch and click <Add> < Drawing>.

Use the pencil tool to draw on the window.
You can attach hand drawn images to individual branches. To attach an image to a branch, click on that particular branch and click ‘Drawing’ button found on the bottom-right of the screen. Use the pencil tool to draw on the window. Use eraser tool to erase part of your drawing Click on delete icon to erase the entire image.
Use color picker tool to change color of the pencil. 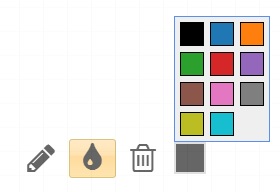 The gesture panel shown is useful for high-end touch devices like tablets.
 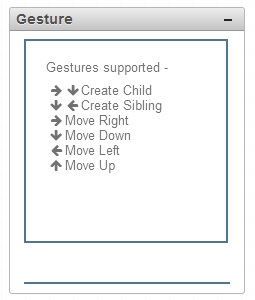 To return back to mindmaps screen, simply click on ‘Drawing’ button again.
 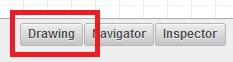 Once an image is added to a branch, the color of pencil icon associated with that branchchanges.
 ![]() To remove drawing attachment from a branch, click on that branch. Go to drawing screen. Use delete button to erase entire image. This deletes the attachment. Click on ‘drawing’ button again to move back into mindmap screen. You can now see the color of pencil icon associated with that branch changes back to original.
To remove drawing attachment from a branch, click on that branch. Go to drawing screen. Use delete button to erase entire image. This deletes the attachment. Click on ‘drawing’ button again to move back into mindmap screen. You can now see the color of pencil icon associated with that branch changes back to original.
You can attach hand drawn images to individual branches. To attach an image to a branch, click on that particular branch and click ‘Drawing’ button found on the bottom-right of the screen. Use the pencil tool to draw on the window. Use eraser tool to erase part of your drawing Click on delete icon to erase the entire image.
Use color picker tool to change color of the pencil. The gesture panel shown is useful for high-end touch devices like tablets. To return back to mindmaps screen, simply click on ‘Drawing’ button again. Once an image is added to a branch, the color of pencil icon associated with that branchchanges. ![]() To remove drawing attachment from a branch, click on that branch. Go to drawing screen. Use delete button to erase entire image. This deletes the attachment. Click on ‘drawing’ button again to move back into mindmap screen. You can now see the color of pencil icon associated with that branch changes back to original.
To remove drawing attachment from a branch, click on that branch. Go to drawing screen. Use delete button to erase entire image. This deletes the attachment. Click on ‘drawing’ button again to move back into mindmap screen. You can now see the color of pencil icon associated with that branch changes back to original.

Use the pencil to start drawing.


Use the eraser to erase (part of) drawing.

Click on the delete icon to delete the entire image.
Use the color picker to change the color of the pencil.

Note: The drawing belongs to the branch that is currently selected.With the movement keys (arrows on the keyboard), you can select other branches.
 [tcb-script async=”” src=”//pagead2.googlesyndication.com/pagead/js/adsbygoogle.js”][/tcb-script][tcb-script](adsbygoogle = window.adsbygoogle || []).push({google_ad_client: “ca-pub-4110739479768364”,enable_page_level_ads: true});[/tcb-script]
Using Google drive with Mind Map Maker
Google Drive is a file storage and synchronization service provided by Google which enables user cloud storage, file sharing and collaborative editing. With collaborative editing support you can let multiple users working with your document in real-time simultaneously. Realtime collaboration feature will be rolling out soon. To get Google Drive work with Mind Map Maker and for storing/opening files, read on. Step by Step information has been provided. Getting access to Google Drive requires a Google Account only. If you are using any Google Products like Gmail, Plus you probably have one or it can be created for free.
Google Drive support page provides more information regarding Google Drive.
Requirements
As mentioned, to access Google Drive, you need to have a Google Account. If you are using any Google products like Gmail, Google Plus or Blogger, you probably have one. If you don’t have one, you can create it for free at www.google.com/accounts
Most probably you have a personal (private) google account and you can access Google Drive directly. In case, if you are using a corporate Google Apps account, the administrator needs to enable Google Drive access (most probably, it should have already enabled). Go to http://drive.google.com to check if you have access to Google Drive. That is, you can login and use Google Drive properly.
While saving and opening files from Google Drive, data transfers from your browser to google drive directly. It is not transferred through our servers. As such, Mindmaps does not store or is completely unaware of your google account credentials. To check if you have access to Google Drive, the best way is to visit http://drive.google.com and check yourself.
Lets begin….
When using Google Drive with Mind Map Maker for the first time you need to authorize to let Mind Map Maker use your Google Drive account. When opening or saving maps in Google Drive, data is transferred from your browser to Google account directly. Authentication is a way of telling Google that you trust Mind Map Maker and allowing Mind Map Maker to use your google account for storing and opening files. To authenticate Mind Map Maker with your google account, click on ‘Authorize’.

Like with all google products, if you are not logged in to your Google account, the page redirects you to the sign in page. Sign in with your google account which you want to use for storing mindmaps. Once successfully logged in, Google asks your permission for using Google Drive with Mind Map Maker. Check the image below. Click on ‘Accept’ to continue.

Once accepted, it will enable Mind Map Maker to store and retrieve files from Google Drive. At this point, if you visit http://drive.google.com, you will notice that a new application, Mind Map Makert, is added to your Google Drive account. This is for your convenience so that you can open Mind Map Maker directly from Google Drive by clicking it.
Initially if you were saving or opening the file, this operation will now continue. Mind Map Maker won’t ask you to authenticate from now on unless you are logged out of your Google Account. Remember, Mind Map Maker won’t be able to open your maps stored in Google Drive if you are not logged in. If you try to access maps without logging in, Mind Map Maker will again ask you to log in to your Google Account.
Maps stored in Google Drive are private. Hence, you can open/save an existing map with a Google Account only if you had previously created that map with same Google Account. For instance, you created a map named ‘Vacation’ with google id, ‘abc@gmail.com’; you cannot access this map if you are logged into another account, say ‘xyz@gmail.com’. This way maps are private and only the creator can view it. (There is way to share your Google Drive maps with your friends. It is mentioned below.)
- Public maps has different URLs each time you modify and save it
- Private (Google Drive) maps have only one URL. It overwrites the initial map if you modify and save it.
Saving Maps to Google Drive
To store maps in Google Drive account, click ‘Document’->’Save As…’ and then choose ‘Google Drive’.Note: When you store a map to our own server as public map it remains public and you can share the URL to your friends. Later, if you modify this map and save it as public map it gives you another URL. That is, it is stored as another map. This is different in Google Drive. There is only one version and one URL. Even if you make changes and save the map, it overwrites the same map with the same URL.
Accessing maps stored on Drive
If you want to see all mindmaps you stored with your current Google Account, click <Document> < Open> beneath Google Drive. This opens a window showing all maps you stored with current Google Account. You can also use the search box to search for a file.

You can also open files by going to http://drive.google.com. You will see the files stored in your Google Drive account there. Click on any Mind Map Maker file. This should, almost in all browsers, opens the file in Mindmaps. (This feature seems not working in IOS browsers for the time being). Mobile browsers don’t exhibit this feature and only option is to use ‘Document’->’Open’->’Google Drive’.

If by clicking Mind Map Maker files does not open in Mind Map Maker app, Mind Map Maker might not have been selected as the default application for .json (application/json) files. In this case, there is one more configuration step required. Right-Click on any Mind Map Maker file, click ‘Open With’ and then select “Manage Apps”. Find Mind Map Maker in the apps list and tick the checkbox “Use by Default”. From now on, clicking your Mind Map Maker files from Google Drive will automatically let it open in Mind Map Maker app.
In case, Mindmap is not listed in the apps menu, click “Connect more apps” and search for Mindmap in the window that opens up. This way Mindmap is manually added to your Google Drive.
Sharing your Google Drive map with friends
Mentioned earlier, maps saved in Google Drive is private. However, if you wish, you can share your Google Drive maps with your contacts. You can choose which friends have access to your files and access privileges. You can read Google support page on sharing for more information.
You can share a Mind Map Maker document with another user from Google Drive. See the image below. This can also be done by clicking ‘Share via Drive’ button found inside mindmaps app.
This opens up another window where you can add/select individual friends or group of friends for sharing the document. You can also invite them via their email id.
When you share a document through Google Drive, Google sends a link to the recipient. They can click on this link to open the file. Their Google Drive account will show this file automatically. In Mindmaps, the recipient can open the shared file from ‘Document’->’Open…’->From Google Drive
One feature of file sharing through Google Drive is that you can set the access privileges. If the access privilege is to save/open a file, then whenever they save the file after some modification, it rewrites the original file. So more than one user can work along with same file and see each other’s changes. If the access privilege is read-only, then your friend does not have the option to rewrite the original file. However, they get an option to save the file in their Google Drive Account as different file.
The URL generated through Mind Map Maker for Google Drive maps are permanent. Thus you can share the URL for your map with friends. The URLs for Google Drive maps are in the form http://app.mindmapmaker.nl/#m:gdXXXXXXXXXXXXX Once you share the same map with your friends, your friends can access the map by just typing the URL you shared.
One limitation of Google Drive file sharing is that, even if you make your maps completely public, the end user still requires a Google ID to read the file. People who are not logged into Google Account still won’t be able to read your file without first logging in and then authorising with Mind Map Maker. For this limitation, we suggest you work with your map and store it in Google Drive until it is ready to be shared as public. Once your map is ready and final, make it public by using our public storage. Thus public can view your map without the requirement of any ID. (Select Mind Map Makerfrom the save options menu). Share the URL with your friends. If you feel URL is a bit too long, you can use short url from ‘Share’ window.
Sometimes, when you open a Google Drive map, Mindmaps says you cannot view this map as you don’t have enough rights to view the map. This is because the map you try to access is not created by the currently logged Google ID or the map was not shared with currently logged Google ID. In this case, goto drive.google.com, log out and log in with the correct Google ID. This often happens if you are using multiple google account for various purposes or your browser is shared by different users.
[tcb-script async=”” src=”//pagead2.googlesyndication.com/pagead/js/adsbygoogle.js”][/tcb-script][tcb-script](adsbygoogle = window.adsbygoogle || []).push({google_ad_client: “ca-pub-4110739479768364″,enable_page_level_ads: true});[/tcb-script][tcb-script async=”” src=”//pagead2.googlesyndication.com/pagead/js/adsbygoogle.js”][/tcb-script][tcb-script](adsbygoogle = window.adsbygoogle || []).push({google_ad_client: “ca-pub-4110739479768364”,enable_page_level_ads: true});[/tcb-script]
Special Functions of Mind Map Maker
Exporting Mindmaps as image
Using Mind maps you can export your created mindmap as image. You may find it useful, for instance, integrating you created mindmap into other applications and softwares. To export your mindmap as image, select ‘Export As Image…’ from the menu. 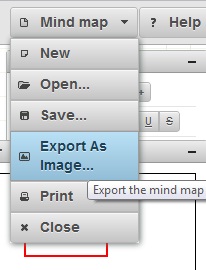 From the dialog box shown up, your created map is displayed as image. To download the map right-click the image and select “Save Image As”.
 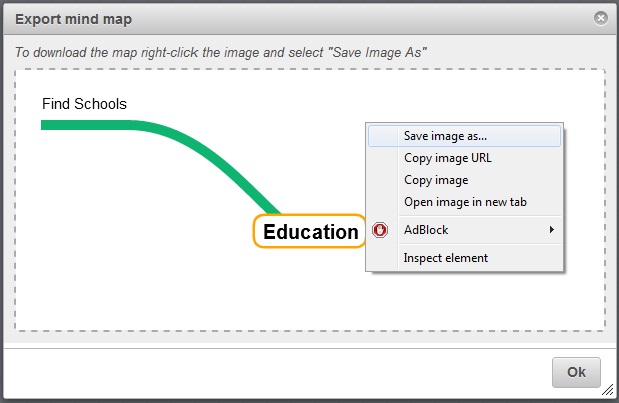 Once you click ‘Save image as…’ it asks you for a location where you want to save your image. Thus after saving you can easily view your mindmap as image from the stored location.
Printing Mindmaps
You can print your mindmap as well. To print your mindmap, choose ‘Print’ from the menu. It has a printer image next to it. 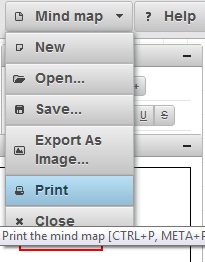 Once you select ‘Print’ option, it shows you the standard browser printing options. You can choose the printer should you have more than one printer. Using Chrome Web browser, you can save it as a Adobe PDF file as well.
 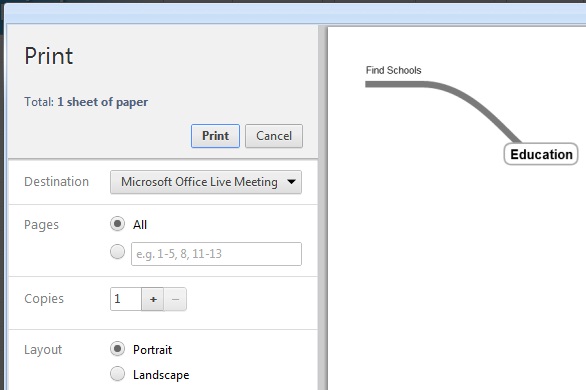 By integrating printing functions directly into the app, it is for your convenience and it saves you time.
[tcb-script async=”” src=”//pagead2.googlesyndication.com/pagead/js/adsbygoogle.js”][/tcb-script][tcb-script](adsbygoogle = window.adsbygoogle || []).push({google_ad_client: “ca-pub-4110739479768364”,enable_page_level_ads: true});[/tcb-script]
Features of Mind Map Maker Webapp
About Mind Map MakerThis is an HTML5-based mind mapping application. This allows you to create good quality mind maps in your browser.The app is available offline. So there is no need for an internet connection constantly. Everything happens in your browser on your computer.
Why Mindmaps
There are many mind mapping apps. However, these apps are often very limited or too extensive. Most web apps require premium features that have to be paid.Mind Map Maker is free and remains free!To keep the app free, there are occasional advertisements. You do not have to click on that. Only click if you are interested.You can also use an Ad Blocker. We even recommend that for schools. In that case we would really appreciate a voluntary donation.
Requirements
You need a decent web browser that implements all HTML5 functionality and offers support for CSS3. Chrome 10+, Firefox 3.6+, Safari 5+, Opera 10.6+, IE9+ should do the job.
[tcb-script async=”” src=”//pagead2.googlesyndication.com/pagead/js/adsbygoogle.js”][/tcb-script][tcb-script](adsbygoogle = window.adsbygoogle || []).push({google_ad_client: “ca-pub-4110739479768364”,enable_page_level_ads: true});[/tcb-script]
SourcesThe original program is Van D. Richard. He built this in open source html5.His version you can find HERE : https://www.mindmaps.app/
In Dutch this app is made by Meester Steeef.His version you can find HERE: http://meester.steeef.nl/mindmap/
Abdul Azeem has further developed this app and added a lot of functionality to it.His version you can find HERE te vinden: https://app.mindmapmaker.org/#m:new
The version of Abdul Azeem has been further developed by order of Brainpartner Madho Singh van Harsh TechnologyThis is the version that this manual is made for:www.mindmapmaker.nl/eng
License rightsDavid Richards / mindmaps is licensed under the GNU Affero General Public License v3.0Permissions of this strongest copy-free license depend on making available full source code of licensed works and changes, including larger works that use a licensed work under the same license. Copyright and license notices must be retained. Contributors offer an explicit grant of patent rights. When a modified version is used to offer a service over a network, the complete source code of the modified version must be made available.